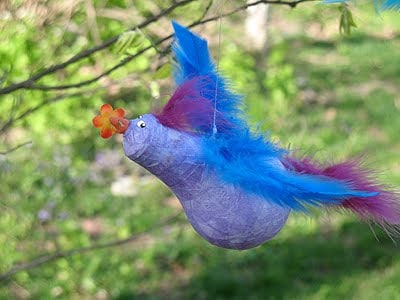
I never throw away light bulbs. I always keep them in a container by my craft supplies, waiting for inspiration… like the day I decided to create these lovely light bulb birds.

Decoupage Light Bulb Birds
On a hot summer night in 2010 I was lying in bed, unable to sleep, pondering ideas in my head. I knew I wanted to make birds from a bunch of light bulbs, but it was the method I was mulling over.
I thought about just painting them, like my light bulb snowman, the light bulb penguin, or my light bulb turkey.
I also considered how to embellish them, like when I made my light bulb angel.
I thought about maybe even using paper mache, knowing it would make the bulb strong. But then I’d still have to paint them and I wanted something different.
Then it hit me… decoupage and tissue paper! I have tons of tissue paper. I save it from every birthday and Christmas present, and have built up quite a collection.
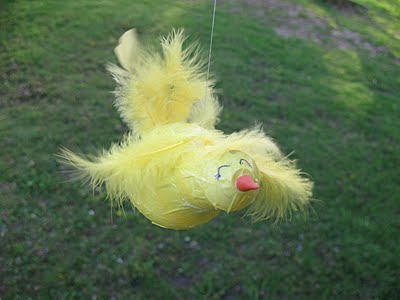
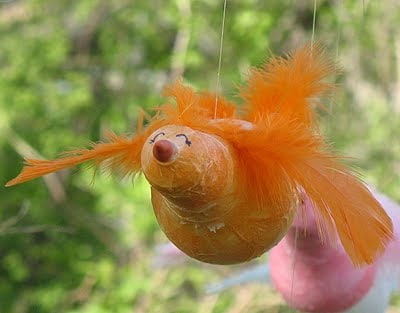
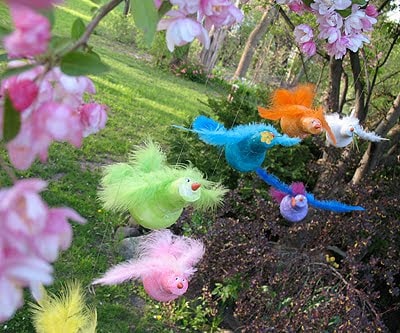
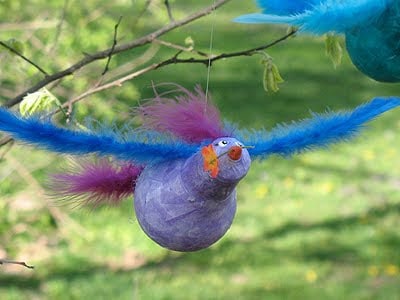
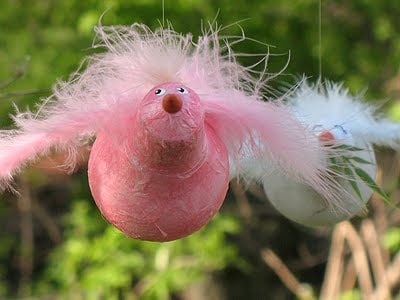
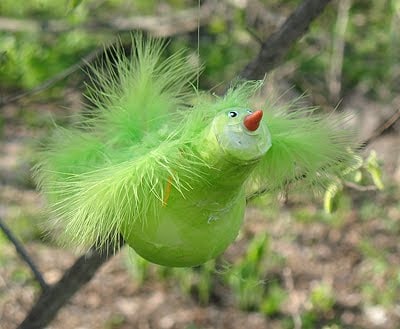
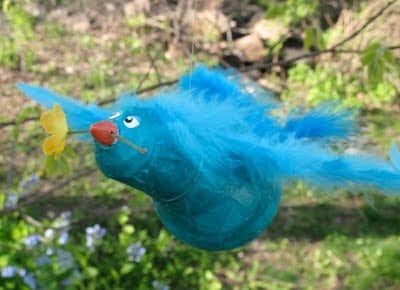
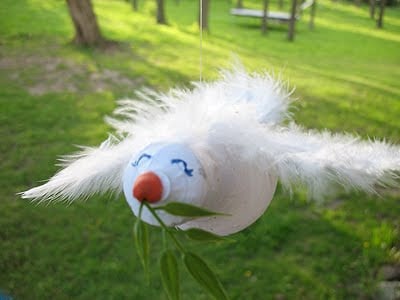
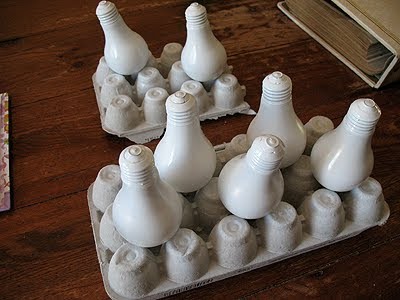
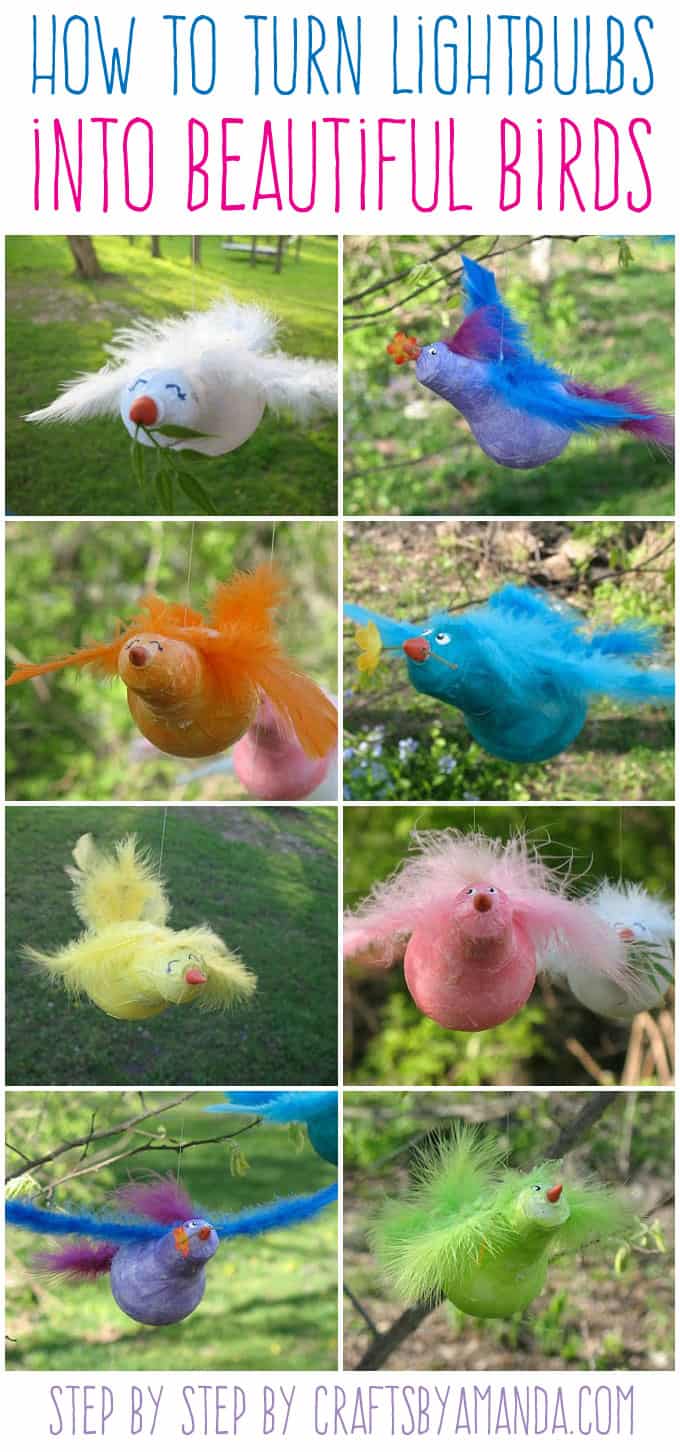
I pulled out 7 bulbs from my stash and got busy. The basic idea is decoupaging tissue paper onto light bulbs, using feathers, fishing wire and modeling clay to finish them off.
Below is a step by step tutorial for my light bulb birds. While they aren’t exactly what I envisioned, I still think they came out lovely. I originally thought of something a little more vintage looking, but when I tried the antiquing gel over the tissue paper coating it didn’t produce the look I wanted, so I wiped it off and went with the bright colors instead. Hope you like them!
There are affiliate links in this post. That means if you buy something from that link, I will earn a small commission, but it won’t cost you anything additional.
Scroll down to the end for the printable version
- incandescent light bulbs
- white spray paint
- tissue paper
- white craft glue and water OR Mod Podge
- paintbrush
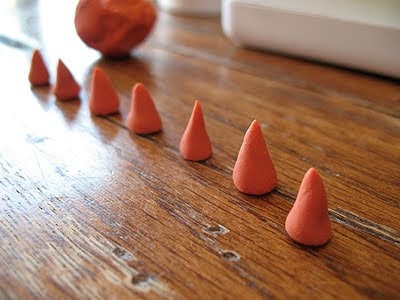
- orange modeling clay (or mix red and yellow like I did)
- cardboard egg carton (to use as a stand)
- acrylic craft paint: white and black
- toothpick
- Sharpie markers (I used colors to match my tissue paper for the eyelids)
- Clear acrylic spray sealer or glaze
- feathers, colors to match your tissue paper
- fishing line
- scissors
- hot glue gun
- small silk flowers or leaves (optional)
Spray the bulbs with a coat of white spray paint. It doesn’t have to be perfect. It’s just to create a white base to decoupage onto so that the dark spots from the screw cap won’t be difficult to cover. Allow to dry.
While the paint is dry, roll small pieces of modeling clay between your fingers and create cone shapes.
Tear or cut tissue paper into squares. Mix equal amounts of white craft glue and water to make your decoupage mixture or use Mod Podge. Use a paintbrush to apply a little decoupage mixture onto the bulb, then pick up a square of tissue paper using the paintbrush (the wet bristles will stick to the tissue paper, picking it up) and gently place it on the wet bulb. Using a light touch, brush the tissue paper with decoupage.
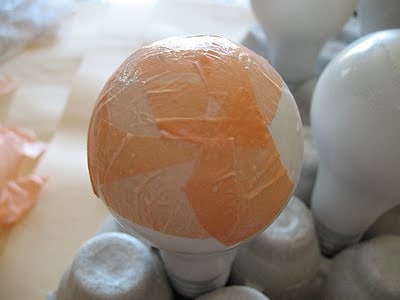
Coat as much of the light bulb as you can, then let dry completely before turning the bulb over to do the other end.
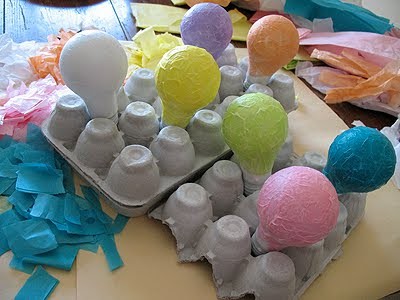
Turn the bulbs over and decoupage the other end. I used about 3 layers of tissue paper, but I basically just kept covering until I was happy with the coverage. Let dry.
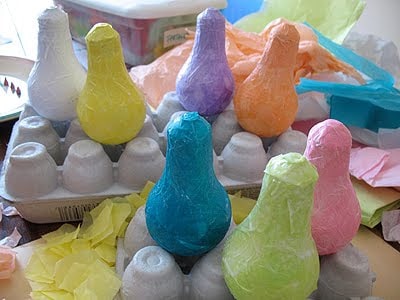
Glue the clay beaks to the flat end of the screw caps.
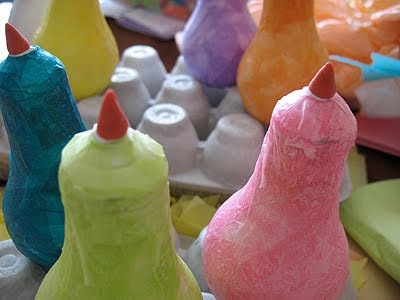
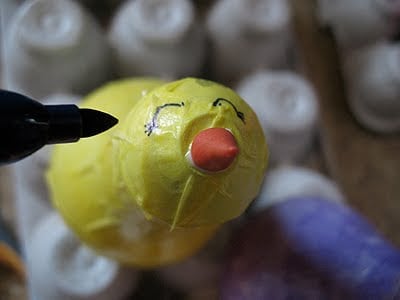
Use the handle end of a paintbrush dipped in white paint to add the eyes.
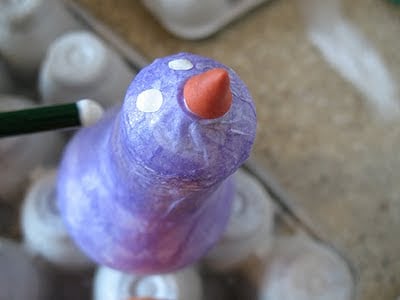
Alternatively, you can use a Sharpie marker to draw on the eyes. Spray the bulbs with acrylic sealer and let dry.
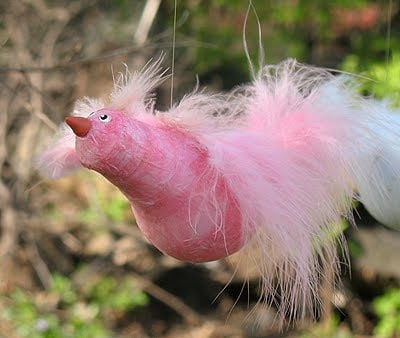
Tie a long piece of fishing line around the bulb and hot glue in place. Glue feathers on as wings, tail and a little bit on top of the head.
Use toothpick to add the blacks of the eyes and let dry. Then use the other end of the toothpick to dot on a small bit of white to the black. You can also add eyelids using colored Sharpie markers. In some of the birds, insert small plastic leaves or silk flowers into the clay beak.
Hang or create a mobile!
Want even more free craft ideas? Be sure to subscribe to my newsletter for FREE recipes and craft ideas sent to your inbox every week.

Decoupage Light Bulb Birds
Supplies
- incandescent light bulbs
- white spray paint
- tissue paper
- white craft glue and water OR Mod Podge
- paintbrush
- orange modeling clay or mix red and yellow like I did
- cardboard egg carton to use as a stand
- acrylic craft paint: white and black
- toothpick
- Sharpie markers I used colors to match my tissue paper for the eyelids
- Clear acrylic spray sealer or glaze
- feathers colors to match your tissue paper
- fishing line
- scissors
- hot glue gun
- small silk flowers or leaves optional
Instructions
- Spray the bulbs with a coat of white spray paint. It doesn't have to be perfect. It's just to create a white base to decoupage onto so that the dark spots from the screw cap won't be difficult to cover. Allow to dry.
- While the paint is dry, roll small pieces of modeling clay between your fingers and create cone shapes.
- Tear or cut tissue paper into squares. Mix equal amounts of white craft glue and water to make your decoupage mixture. Use a paintbrush to apply a little decoupage mixture onto the bulb, then pick up a square of tissue paper using the paintbrush (the wet bristles will stick to the tissue paper, picking it up) and gently place it on the wet bulb. Using a light touch, brush the tissue paper with decoupage.
- Coat as much of the light bulb as you can, then let dry completely before turning the bulb over to do the other end.
- Turn the bulbs over and decoupage the other end. I used about 3 layers of tissue paper, but I basically just kept covering until I was happy with the coverage. Let dry.
- Glue the clay beaks to the flat end of the screw caps.
- Use the handle end of a paintbrush dipped in white paint to add the eyes.
- Alternatively, you can use a Sharpie marker to draw on the eyes. Spray the bulbs with acrylic sealer and let dry.
- Tie a long piece of fishing line around the bulb and hot glue in place. Glue feathers on as wings, tail and a little bit on top of the head.
- Use toothpick to add the blacks of the eyes and let dry. Then use the other end of the toothpick to dot on a small bit of white to the black. You can also add eyelids using colored Sharpie markers. In some of the birds, insert small plastic leaves or silk flowers into the clay beak.
- Hang or create a mobile!
- Patriotic Pinwheels - June 23, 2026
- Fingerprint Daddy & Me Coffee Mug - June 12, 2026
- Patriotic Bandana Wreath - June 9, 2026


Pam Chan says
Hi,
Love your ideas and following them on pinterest. However, I live in the UK and we dont get good old ordinary light bulbs anymore ( banned by the despots in Europe) Could you possibly think of ways to use other shaped lightbulbs?I think I could make small birds with candle shaped ones, but as for penguins, they would look a bit thin? I defy anyone to come up with ideas for the long life curly energy saving lightbulbs we have to use these days!
Amanda Formaro says
I have seen cute little ornaments made from the long chandelier type bulbs. I’ve seen penguins, snowman faces and reindeer, as well as just painting them and adding dots of glitter or stripes. I wouldn’t do anything with those curly bulbs. From what I understand they are filled with mercury and if they break it’s dangerous.
Evelina says
Clever idea! It’s very creative of you to come up with such useful and beautiful things made from discarded materials.
Amanda Formaro says
Thanks so much Evelina!
Rachel says
I absolutely adore these! I’ve made six of them so far whenever a nightlight bulb dies! I hung them all over my bedroom ceiling. Super cute, thanks Amanda!
Amanda Formaro says
That is such a fun idea Rachel, thank you for sharing! :)
Kathy says
Oh, so cute! I want to give these a try! Will you, pretty please, consider sharing with my readers at http://sassafrassalvation.blogspot.com/2012/02/sasss-sunday-salvation-show-12.html ?
Hugs,
Kathy
Tammy says
Those are so cute!! I really like this very much!!
thruthebugsonmywindshield says
Absolutely the cutest! I'm going to have to make one for myself. Brought a big smile to my face first thing this morning. Excellent idea!
Amanda says
That is so cool!! Wish I could see pictures of them, thanks SO much for sharing that! :)
Anonymous says
I wanted to let you know I came across your picture online and this past July I made these with the kids at our campground. I do Recreation Activities on the weekends and I had over 20 children make a light bulb bird and even had a couple adults come at the end and make one as well. We used glitter modge podge as our final coat on the birds and the children all loved……so cool!!!!
Amanda says
Hi Mel :) The modeling that I used does not dry hard, it stays supple. As far as hanging them outside I would think that as long as you applied an ample amount of clear sealer spray, they would be fine, however, the feathers will probably suffer the most. If it rains, they'll get wet and matted. Would love to see yours if you make them! :)
Mel♥ says
Love this idea! Great summer project to keep the kids busy when it rains :D 2 questions ~ Does that modeling clay dry hard? Also I am wondering what would happen if they did hang outside like in my garden :D I need some garden decor!! LOL!
Amy Bowman says
so cute and quirky!
I think a bunch just spray painted white sitting in a black bowl could look really cool and modern. Never thought of saving my lightbulbs, now I will start!
Thanks for linking to "AP Tuesdays!"
Nf1andprek-whisper says
i saw this on sumo and gave her the credit till I realized it was your, I am your newest follower, I am making those birds for a birthday party I have planned that is a whimsical theme, i will post pictures, I am a party planner on the side.
if you want to visit me
http://nf1andpre-kwhisper.blogspot.com
Carine says
Such a creative idea! You are featured on homemade haven
Summer says
Great idea! I featured it on my blog today!
http://sumossweetstuff.blogspot.com/2010/05/showcase-saturday_08.html
Come grab a featured button!
Thanks for linking up!
Sumo
Summer says
Great idea! I featured it on my blog today!
http://sumossweetstuff.blogspot.com/2010/05/showcase-saturday_08.html
Come grab a featured button!
Thanks for linking up!
Sumo
concretenprimroses says
Those are great!
Kathy
michelle@somedaycrafts says
Love the idea!! Thanks for linking up!! We featured you so come grab a button!!
Amanda says
Thanks so much everyone!
Al – yes I know! I saw those and commented on them mid-April :) very cool
Al says
This is too cute! Here is my attempt at light bulb art – http://almcleary.com/blog/?p=79
[email protected] says
Aww, these are so cute! Way creative! Thanks so much for the how-to, I'll be linking.
Ann @ makethebestofthings says
So cute and clever! I can see white doves for Christmas.
Kristi Flanagan says
Very cute!!!! Thanks for planting this creative seed too!
See you Friday to plant more seeds!
Kristi
Punkin Seed Productions
Stephanie Lynn says
Hi Amanda, Just wanted to let you know I'll be featuring your birdies today! Stop by and grab a featured Button if you like. Thanks so much for linking to The Sunday Showcase! ~ Stephanie Lynn
Stephanie Lynn says
Amanda, This is the cutest thing I have ever seen! Your creativity is amazing! {on all your projects} Love these! Thanks so much for stopping by and joining the Sunday Showcase Party! I greatly appreciate it. Hope you have a wonderful week. Hope to see you again next Sunday! ~ Stephanie Lynn
Amy says
These are so sweet! What a perfect project for spring! Thanks for sharing!! :)
Bonnie says
Those are the cutest! I love them!
Rory from Tools Are For Women Too! says
Those look wayyyyy fun! Thank you for sharing them on Modern Craftswoman Monday. I really appreciate you linking back. Rory
Allison @ House of Hepworths says
Those are darling!! I can't believe they are from lightbulbs!
Thanks for Hookin' your project up at my weekly Link party!!!
creativejewishmom.com says
Amanda, you are a riot! I love that you shared that you were thinking about this while lying in bed! Of course your fellow crafters can totally relate, at least those who actually have time to sleep…..
thanks again for a great project and for sharing on Craft Schooling Sunday!
Amanda says
Thanks ladies for your kind words!
Kathryn says
Super cute! The next time I have a bulb burn out that is this shape I am going to make one of these. Thanks for sharing it with us!
Entertain Exchange says
Wow – these are great!
Maria says
these are absolutely Caaa-YOOT!. I'm a new follower, came over from Saturday is Craft Day. Hope your having a wonderful weekend.
Amanda says
Thank you all sooo much for all the nice comments! :)
Paula says
Love these! I am adding your link to my garden blog for yard art ideas. Thanks for sharing, Paula from Idaho
Sandi says
Oh my gosh!!!! Cutest thing I have ever seen. With light bulbs!!!! I hope you don't mind, but I just have to try this. My grandkids will think Meme is the smartest Meme ever, with these.
Thanks for sharing.
Sandi
Lori says
How very cute.. What a great idea..
Thanks for joining Get Your Craft on Thursday. Please join me next week for another great party!
Room to Inspire says
These are so adorable and super creative! How do you come up with these great ideas!!
Chelsea
Cheryl says
AWESOME! Saw this post on Craft Gossip and just had to stop by!
Fawnda says
Those at too cute for words! I love them flying in your trees! :)
Fuji Mama says
So stinkin' cute!!!!!
Winnie says
Oh, my. Too too cute!
Megan says
I could see a whole flock of these hanging from tree outside. Too cute!
Handmade Specialties says
These are adorable Amanda! Great job!
Raeanne
Katrina says
Those are really cute, Amanda!
mermaid says
Oh, so so lovely! I like the colours too! We will be busy tonight with my little daughter :)
Michelle @ Sweet Something says
How cute! I love the bright colors!
Tiffiny Felix says
They are *so* cute!! :)
Sherry @ No Minimalist Here says
These little birds are adorable! How creative you are.
Anonymous says
This is so cute. We are always trying to come up with cute things for the kids at church. This will be great. Thank You, Betty
cheryl says
THESE ARE ABSOLUTELY ADORABLE!! BUT WHAT HAPPENS WHEN THEIR OUTSIDE AND IT RAINS. THE TISSUE PAPER WILL GET ALL WET AND SOGGY AND FALL OFF, RIGHT?
Amanda Formaro says
Hi Cheryl. These should not be kept outside. I took the pictures outside because it was a pretty backdrop, but even if you used an “outdoor formula” Mod Podge sealer, the feathers would still be ruined by the rain. I would use these to hang from the ceiling in a sunroom or even a nursery! :)