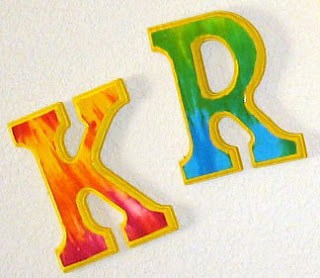
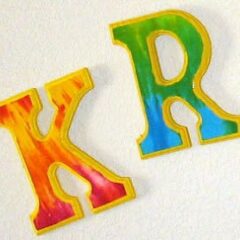
You can easily make these super fun and colorful Tie Dye Wall Letters – a perfect home decor craft. These groovy wall hung letters are a hit, so much so that my daughter’s friends asked how they could make their own! I found some tie dye fabric at the craft store and pulled out my paints. The results were fun and funky.
Decorating your daughter’s room can be a challenge, especially when she reaches the preteen and adolescent years. When Kristen, my only daughter amongst three boys, was 12 years old, she wanted me to take the girlishly pink wall letters her grandma had given her, and make them more “hip”. She was in that “I don’t like pink anymore” stage and was loving the vibrant colors of tie dye.
Tie Dye Wall Letters
designed by Amanda Formaro

Make Tie Dye Wall Letters
Supplies
- wooden wall letters
- sand paper
- Liquitex Basics Gesso optional
- yellow acrylic craft paint
- tie dye fabric
- razor blade or box cutter
- white craft glue
- paint brush
- water
- nail-less sawtooth picture hangers
- hammer
Instructions
- If needed, sand wooden letters to make them smooth. You can find wooden letters at most craft supply stores or order them online.
- Paint a coat of Liquitex Basics Gesso on each letter. This is a craft medium that will help provide better coverage and will require less yellow paint. This step is optional, or you may choose to use white acrylic paint if you don't have any gesso handy. Allow to dry completely. Paint all letters with yellow craft paint, allow to dry and repeat.
- Once paint is completely dry, lay letters on work surface in front of you. Cut sections of tie dye fabric large enough to completely cover each letter. Each letter should have its own piece of tie dye fabric. Mix together equal parts of water and white craft glue, mixture should have a milky and paintable consistency. Use an old paint brush to apply a coat of glue mixture onto raised surface of the letter where you want the fabric to be. Lay the fabric onto the glue mixture and gently press down. Use old paintbrush to paint another coat of glue mixture over the top of the fabric, thus decoupaging the fabric on. Repeat these steps for each letter and allow to dry completely before moving on to the next step, at least 2-3 hours.
- Using a box cutter or razor blade, cut away the excess fabric by stretching out the excess fabric with your fingers and cutting along the edge of the raised letter. To stretch fabric out, gently pull fabric away from the glued edge until taut, then use the box cutter to trim away.
- Turn each letter over and hammer a nail-less sawtooth picture hanger into the back for hanging on the wall. For letters with two "tops" or longer top edges such as "K" or "T", use 2 hangers. Hang your tie dye letters on the wall!
Latest posts by Amanda Davis (see all)
- Fingerprint Daddy & Me Coffee Mug - June 12, 2026
- Patriotic Bandana Wreath - June 9, 2026
- Ladybug Painted Rocks - June 5, 2026


Amanda Jo says
This is wonderful! When I was pregnant, I was given wooden letters (that spelled my daughters name) as a gift. I gave them to a friend who is an amazing artist, along with a piece of my daughter’s crib bedding so she could paint them to match. She did a great job and it started a trend. She has now done this for all of our friends since then. Now, I have a baby shower coming up and I would like to do the same for her. The only problem is…I’m not so artsy. But this is right up my alley. I’m so excited to try this. I think my friend will love it! Thanks!
admin says
That sounds awesome, I hope you have fun with it!
Tiff @ Making The World Cuter says
Super cute!
-Tiff
JulieChats says
How cool! My 8 yr old would love these!
Just stopping by from Today's Creative to say hi! Just signed up to follow you too. Stop by when you get a chance http://juliechats.blogspot.com. I'm always looking for a few more crafty followers!
Heather@ My Frugal Family says
Super cute!!
Thank you so much for linking up with the Talented Tuesday link party at My Frugal Family, which is hosted every Tuesday. Please feel free to stop back in every week and post your newest projects!
Rana says
What a great project. I cannot wait to try this.
Amanda says
Hi guys, thank you all so much for the nice comments!! :) And thanks for the stumble Amy!
Lorie says
Those are SO FUN!!!
Amy @ Simply Sugar and Gluten Free says
What a great post and so easy to do. Your directions are fabulous…gave you a Stumble.
RootsAndWingsCo says
I AM LOVING THOSE LETTERS! They turned out great! I am loving those colors. I have boys and no girls so everything around here is sans pink (which I too started hating in my preteen years).
Katrina
Megan says
My daughter would love these! Very cute. Thumbs up! :)
artsy_momma says
Very cool! I love learning new things :)
Amanda Formaro says
Thank you Rachel! You are so sweet! :)
[email protected] says
These are so fun Amanda, I love this idea! Thanks so much for the how-to, I'll be linking.