This little country dammit doll is a great comfort gift for someone you care about, or an adorable addition to any room in your home. You may remember dammit dolls from your grandmother’s time period and they are still around today.

How to Make a Dammit Doll
Several years ago, I made this for a friend who was living in Germany. Her husband was in the military and away quite a lot. She missed him dearly and seemed so sad. She loved the gift and still cherishes it today.
Some people are offended by the word dammit. You can substitute “dang it” or “darn it” if you like.
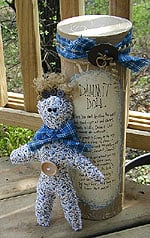
NOTE: many people have asked me about the tall cylindrical paper mache box. I made this doll in probably 1998 or 1999. At the time, I found the cylinder at Michaels. While it’s a cool box, if you can’t find one, you can just as easily use a regular paper mache box or even a Pringles container, or no box at all. Just print out the poem on card stock and tie it to the doll. :)
If you prefer to buy a dammit doll, you can find one here.
Below is the poem:
DAMMIT DOLL
When you want to climb the wall,
And stand right up and shout.
There’s a little Dammit doll
You cannot do without.
Just grasp it firmly by the legs,
And find a place to slam it.
And as you whack the stuffing out
Yell Dammit, Dammit, Dammit!
If Dammit’s not a word you say
Then twist its little neck
And grumble out repeatedly
Oh Heck, Oh Heck, Oh Heck!
And once your done abusing it
Just sit it on the shelf.
But hug it first, as I’d hug you
If I were there myself.
Country Dammit Doll
Supplies
FOR THE DOLL
- country floral fabric half of a yard should do it!
- doll pattern
- white yarn
- darning needle
- Fiberfil
- curled jute
- sewing needle
- thread to match fabric
- 6 buttons to coordinate with the fabric
- 2 flat backed black eyes
- fabric glue
- large unpainted wood button
- scrap of blue gingham fabric for neck bow
FOR THE CONTAINER
- 12 ″ cylindrical papier mache container
- acrylic paint in antique white light brown, and country blue
- crackle medium
- paintbrush
- household sponge or sponge scrap
- curled jute
- rusty tin button
- blue gingham fabric scrap
- white tacky glue
- black fine tip craft pen
- ruler
- scrap piece of paper
- pen or pencil
Instructions
THE DOLL
Bodice
- To begin, print out the doll pattern and cut two pieces from country floral fabric, RIGHT side of fabric facing out. This doll is sewn on the outside, rather than sewn and turned inside out. This gives it a more primitive country look. Using a darning needle and white yarn, begin at the top/center of the head and sew downward, all the way around the doll until you get to the other side of the neck. Pause here to stuff the doll with Fiberfil, using the eraser end of a pencil to gently push the stuffing into the arms and legs. Complete the stuffing of the doll’s head and sew shut, knot off.
Embellishments
- Using a length of curled jute (can be purchased in the craft store where doll hair is sold), cut into 1 1/2″ pieces. For each piece, fray the ends halfway, leaving the other half curled. Use a sewing needle and thread to sew the curled end of the jute pieces to the top of the head, frayed end should be pointing upward for the hair. You will need around 6 or 7 pieces of jute to complete the hair. Sew 3 buttons to the front of the hair, in the center, and 3 to the back, running thread through two buttons at once (one in back, one in front). Cut a strip of blue gingham fabric and fray the ends. Tie around doll’s neck and secure with a couple of threads. Use fabric glue to adhere eyes to the doll’s face. Sew wood button to the front of the doll’s body.
THE CONTAINER
- Paint the papier mache cylinder and lid with a coat of antique white acrylic paint and allow to dry completely. Following the directions on the crackle medium, apply a coat of crackle medium over the antique white, and allow to dry according to the manufacturer’s directions (usually 15-45 minutes, or until tacky but not completely dry). Finish with a coat of light brown, again, follow the directions on the crackle medium! Use single brush strokes, DO NOT brush over and over, you will lose the crackle effect. Allow to dry completely.
- For the lid, cut a piece of blue gingham fabric long enough to fit around the lid, fray and tie. Trim and fray the ends. Use tacky glue to secure the fabric to the lid. Tie a piece of curled jute around the lid over the fabric, tie in place, secure with tacky glue. Gently thread a rusty tin button with the jute, and tie, ends should hang downward.
- When the light brown coat is dry, use the household sponge to apply an oval shape to the front of your cylinder using antique white. The oval should cover most of the length of the container, leaving about an inch at the bottom and the top (below the lid). Sponge a light border of country blue around the outer edge of your oval.
- Using a piece of scrap paper and a pen or pencil, sketch out the poem listed below to ensure that you can fit it all on your oval. You can use a ruler to approximate how much area you have to work with. Use a craft pen to write on the poem when you are comfortable with it.
Expert Tips & FAQs
Originally published on: Mar 4, 2010
- DIY Mosquito Repellent Candles - July 10, 2026
- Mason Jar Solar Lights - July 3, 2026
- Patriotic Pinwheels - June 23, 2026


rose yigzaw says
hi
Im looking for the poem but never found it
I have a doll made but wanted to write out the poem and attach it also
Josie Short says
I can’t find the poem
Barbara Sommons says
So cute and thanks for sharing. I was wondering what size flat back eyes you used. Are they about 11-12mm?
Marci Tilley says
I work with teens that are dealing with trauma so I am going to make these with them. I am changing it to the Dang it dolls but I think that it will be a fun project and therapeutic for them. Thanks for the great idea!!!!
Joy Loewner says
I am now 81 years of age and somewhere among the years I have made many
I am now 81 years of age and had my very own doll so LONG ago. In my spare time I would love to make these so cut dolls. Would you be kind as to email me the “How to make>. I look forward to your reply on “HOW TO DO” Hope to hear from you soon. Thanks for reading. JOY
‘
Julie Todd says
My mom was making Dammit Dolls back in the 80s. I actually just found one she made, along with the typewriter note attached. ❤
Maddie White says
Hi Amanda,
I had my own “Dammit Doll” in the 80’s when I had breast cancer. However, about 20 years ago I let someone use it and whoever it was never returned it. I no longer have a sewing machine nor do I hand sew, but I would love to get one like yours. The ones’ they sell in stores and on-line are pretty ugly. The reason I want one is because my niece has pancreatic cancer and they don’t expect her to live through the year.
Any ideas on how I can get one?
Thanks in advance,
Maddie
Amanda Formaro says
Hi, Maddie! I am so sorry about your niece. My thoughts are with you! Have you tried looking on Etsy for Dammit Dolls? They have quite the collection of different types. You can find them here >> http://tidd.ly/8ed2bac3 . I hope this helps a little! Take care!
Bettina Croft says
Hi Maddie
I saw your comment and wondered did you ever get your Dammit Doll ?
Jo and Elinor says
I reuse a pringles can for my dolls….just cover in paper and embellish :)
connie burns says
Hi everyone. I’ve used empty Crystal Containers. They are clear plastic, with lids. I print out the poem and print it on brown paper, used for scrapbook. I add a boarder around the print, cut it out, then pin it to the doll’s bow on the Neck. A cute rag strip is added around the lid. Works out well. Recycling the container is a good idea.
Amanda says
An empty container of Quaker Oats could be a cylinder tube big enough……and just cover with paper :) Cute idea.
Lorri says
Thank you for this tutorial…I’ve seen other Dammit Dolls….but your doll is just so lovely. I’ve made 10 dolls at this point with my only problem being that I am having a hard time parting with any of them…
Thank you for the inspiration.
Amanda Formaro says
Thanks Lorri, that is so sweet!
Barbara Hiza says
where’s the actual pattern for the doll itself
Amanda Davis says
There’s a link in the post, the sentence is highlighted in green to make it easier to see. It says “Download the doll pattern here” Here’s the direct link https://craftsbyamanda.com/wp-content/uploads/2010/03/dammit-doll-pattern.pdf
Karen says
I have seen these before and I have some made for an upcoming sale. coincidence that i saw this tonight. I hope they sell for Mother’s Day!!
Jo says
I love it. Thanks for sharing x
Mary Kissel says
Dear Amanda, I’ve been making these for about 7 years, but mine are crocheted. I get to express my self when I crochet the clothes and do the hair. I can “express” myself when doing the face expression as well. I had lost the poem though. Thank you for reprinting it. Have a wonderful New Year.
Amanda Formaro says
So glad it was helpful mary! And thank you for sharing how you make your dolls :)
Judy Waggoner says
Does anyone know where I can buy these ? I’m not crafty enough to do this myself.
Amanda Formaro says
Hi Judy. Check Etsy, I saw some on there before Christmas ;)
Kelly says
I made a few of these for gifts! Thank you!! Can you to me where you found the tubes. I am having a hard time finding them. Thank you!!
Amanda Formaro says
Hi Kelly. I made this project a long time ago. I had actually found the tube at Ben Franklin. I’m afraid i haven’t seen them at craft stores in a while. However, you could do a search for cardboard wine bottle boxes and that might work!
Charlene Kennett says
A friend made me a Dammit Doll for my birthday recently….we had so much fun reading the poem & acting out the “slamming” at a club meeting. I told my daughter about it….she came this weekend & we cut out 50 dolls….this is what her relatives are getting for Christmas…..guess I’ll have to make some for gift giving too….I think men need them too. Thanks for the ideas.
Amanda Formaro says
That’s awesome, I think these dolls are great and have a fun story that shows our history!
♥Suzanne♥@AbbyShabbyB says
These are so AdoRAbLe!!! I will be featuring you at AbbyShabbyB… I have never heard of this,, but my grandma who is 95 years old has,,, guess what she is getting!,,lol Thanks so much for sharing!
Amanda says
How cool Minny! I sometimes get slack for this doll from more "proper" moms, but I think they are fun and sweet :)
christine says
amanda would u consider making one for me? id gladly send u money!! and u could send it to me once u get the money….? let me know
Amanda Formaro says
Hi Christine – I’m sorry! I don’t make and sell my projects. I’m sure you can find something on Etsy or maybe Artfire :)
Lorri says
I would be happy to make one for you if you are still interested.
Minny says
I love these little dolls.. Mom used to make them out of brown material & cut them out like a gingerbread man. Sometimes she made dresses for them & some she didn't.
I haven't made any for a long time. Thanks for posting this. Guess what I'll be doing next week? LOL
Veronica says
I just love this little doll. I have it featured at Veronica's Korner. Please stop by and grab your Featured button.
http://veronicas-korner.blogspot.com/
Andy Porter says
I love Dammit Dolls. I haven't seen them in such a long time. They always make me laugh! Great job! I'm so glad you linked to Creative Cats this week!
jennwa says
I have never seen a Dammit Doll but that would be a great gift.
Thanks for sharing.
Lanie Ree says
Hey, I am going to Feature this a week from tomorrow! Just thought I'd let you know in advance :)
Hoosier Homemade says
What a cute little doll! Thanks for sharing!
I'm visiting from Tip Junkie!
~Liz
Megan says
I think I could use a Dammit Doll. Especially one that is so cute!
Lori says
This is so cute. I need to make one and take it to work…
Thanks for joining Get Your Craft on Thurs. Please come by next week for another great party.
Lori
fawnda says
very cute!!
Denise says
LOVE THIS IDEA!
Stopping by from LIFE AS LORIE!
Please stop by!
http://extremepersonalmeasures.blogspot.com/
Enchanted Rose Studio says
I've never heard of this! I loveeee it! How absolutely charming! Wonderful idea! So clever! Darling poem!
Cheers!
Tina
Embellished Bayou says
Like some others, I've never heard of these, but what a cute idea! That little poem is great.
Amanda says
Thanks ladies! I remember when I first heard of dammit dolls, loved the concept and the poem. :)
Sam just sews says
Hi Amanda, I’ve just found this post and I really want to make one for a colleague who is leaving us. Could you please tell me roughly what size this doll is and what stitch you used to sewn it up, many thanks in advance, tracy
Amanda Formaro says
The doll was approximately 10-inches tall. I used an overcast stitch :)
Sherrie says
Where is the doll pattern that’s printable
Amanda Formaro says
Hi there. There’s a link in the blog post to the pattern (it says download the pattern here), but here is the direct link https://craftsbyamanda.com/wp-content/uploads/2010/03/dammit-doll-pattern.pdf
Deeba PAB says
LOVE IT…. the colours, the blue and khaki, the entire thing! I'd love to do this one day Amanda!
concretenprimroses says
I've never heard of these. Neat gift for the right person. I've been wondering what to do with my oatmeal tubes…
Kathy
Lanie Ree says
I have never heard of this! But it is a really good idea. I'd be afraid to hurt it's feelings, it's so cute (I know, I know. but still.)
Thank you for linking up to A Little Craft Therapy with Life in the Pitts.
Jennifer, A Self-Confessed Foodie says
This is such a fun idea! There are definitely days when I could use one of these!
Amanda says
Thanks ladies!!
Amanda – Umm that's weird, I guess because your name is Amanda my blog thought you were me and made your comment pink!
Amanda says
I've never seen one of these – how cute!
Sandy says
My mom had one of these dolls and today I wish I had one to bang around!! love it!
Sandy
http://thewondersofdoing.blogspot.com/
Angie @ The Country Chic Cottage says
I might have been living under a rock but this is the first time I have heard of this…it is too cute!! Thanks for sharing!
Lis Garrett says
Oh, I wish I were crafty enough to make this! I’ve never seen one of these dolls, but how hilarious. *Love* it!
Misty Hanke says
If you cannot find a tube, what about an oatmeal box. Covered and decorated of course :)
Amanda Formaro says
I actually saw these tubes at Hobby Lobby recently!